Vizard 8 » Tutorials & Examples » 3D models » Hierarchical models & coordinate systems » Tutorial: Hierarchical Models
8.3.1
This tutorial demonstrates how to create hierarchical relationships between models. The ideas presented here are fundamental computer graphics concepts and required knowledge for the virtual world creator.
These concepts will make a lot more sense if you understand coordinate systems.
This content is discussed in more detail in the reference section.
If you have trouble getting the code in this tutorial to work, you can find the complete example scripts in the \tutorials\3Dmodels directory.
Add the following initial code to your script:
This simply adds the main body of the carousel. It also spins the carousel with the Action system. We will now add some poles that automatically move as the carousel moves.
To setup a model that maintains its position and orientation to another model we will utilize Vizard's scene graph. The scene graph is a hierarchy between the models in the virtual world and is like a family tree. If a family tree is a scene graph, each person in the family tree would be known as a node.
Each node has a transformation matrix, which defines the node's position, orientation and scale relative to its parent, or in the parent's coordinate system. So conceptually, the transformation matrix offsets the node's position, orientation, and scale from its parent. For example, if the transformation matrix offsets the child nodes position [0, 1, 0] with respect to the parent and the parent's position is [1, 1, 0] then the nodes absolute position in the world is [1, 2, 0]. The node's transformation matrix, combined with all the transformation matrices of the nodes parents, defines the node's absolute position/orientation/scale or the node's position/orientation/scale relative to the world.
To compute a given nodes position, you could move through all of the parents of the node, starting at the top of the scene graph, and add the position offset encoded in each of the parent's transformation matrices and the position offset encoded in the given node's transformation matrix. The equation would look like this: myNodesPosition = myNodesPositionOffset + parent1Position + parent2Position + ... + parentLastPosition; For example this could look like: myNodesPosition = [1,0,0] + [1.2, 3, 1.5] + [0, 2, 0].
That's a lot to take in so don't worry if you don't understand everything. The tutorial will demonstrate these ideas.
When a 3D model is added, a new node is created in the scene graph to define the 3D models position, orientation and scale. With the viz.addChild('carousel.wrl') command, the carousel's node is created under the viz.WORLD node. By default, nodes are added to viz.WORLD which is the "root node," or the node at the top of the tree.
We would like the poles to move with carousel, so we will make the poles children of the carousel, not of viz.WORLD. Because the pole is a child of the carousel in the scene graph, the carousel will be on the path from the root node to the pole. This causes the carousel's position/orientation/scale to be included in the calculation of the poles position/orientation/scale. To add a node as a child of another node, use the parent argument:
Now the pole is at the exact same orientation and position as the carousel, so it is hidden inside the carousel's central cylinder. To offset the position of the pole, we will modify the pole's transformation matrix.
To review, each node, like our pole models, has a transformation matrix which encodes the node's position, orientation and scale relative to its parent. When a node is first added, the default transformation matrix has no effect and the node simply takes the position, orientation, and scale of its parent. This is why the poles are at the center of the carousel. To move the poles away from the carousel, we will change the pole's transformation matrix with the setPosition command.
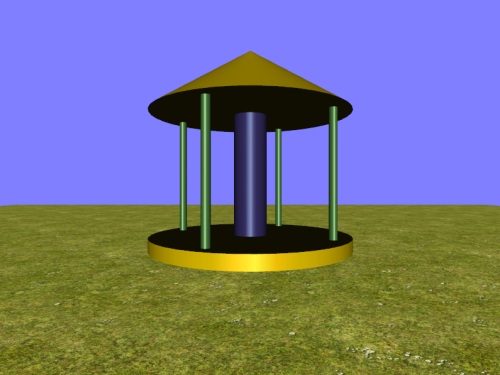
Notice that the pole's positions are set 2.5 meters along different axes. Imagine that the carousel has lines sticking out of its center that represent the x, y, and z axes. This is the carousel's coordinate system. As the carousel rotates, these axes rotate with it. As a child of the carousel, a pole's transformation matrix affects the pole in the carousel's coordinate system. The pole1.setPosition([2.5,0,0]) command tells the pole to go to the 2.5 point on the carousel's x axis. As the carousel spins, the pole maintains its 2.5 position on the carousel's x axis, thus spinning with the carousel.
Now lets add some horses to the poles.
The following code adds a horse to each pole and changes the transformation matrix to make the horses face the direction of spin. As with position, the orientation change effected by the horses' transformation matrices works in the coordinate system of the parents, the poles. Because we don't change the position portion of the transformation matrix, the horses keep the same positions as their parents, the poles.
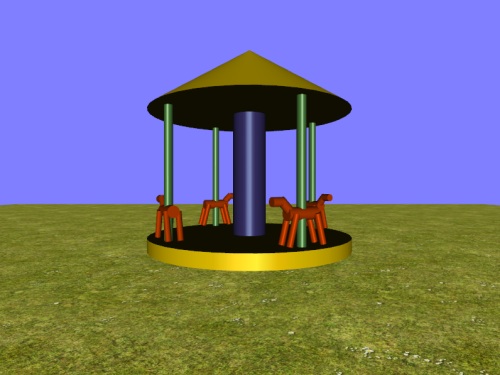
Now, we can reposition and rotate the carousel model as much as we like. The parent-child relationships we have created in the scene graph will keep the carousel intact. If we wanted to make this carousel without using a hierarchical chain, we would need to manually calculate the position and rotation of each object as the carousel is spinning.