Vizard 8 » Reference » Viewpoints & Windows » Perspective projection
8.3.1
Perspective projection is a type of rendering that graphically approximates on a planar (two-dimensional) surface (e.g. computer monitor) the images of three-dimensional objects so as to approximate actual visual perception. It is sometimes also called perspective view or perspective drawing or simply perspective. A perspective projection drawing must be made according to an established geometric protocol.
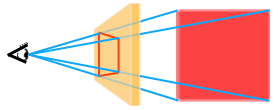
Perspective works by representing the light that passes from a scene, through an imaginary rectangle (the computer screen), to the viewer's eye. It is similar to a viewer looking through a window and painting what is seen directly onto the windowpane. If viewed from the same spot as the windowpane was painted, the painted image would be identical to what was seen through the unpainted window. Each painted object in the scene is a flat, scaled down version of the object on the other side of the window.[1] Because each portion of the painted object lies on the straight line from the viewer's eye to the equivalent portion of the real object it represents, the viewer cannot perceive (sans depth perception) any difference between the painted scene on the windowpane and the view of the real scene.
By default, Vizard will render the scene in symmetric perspective projection. You have two commands to control this type of projection, <window>.ipd and <window>.clip.
To create more exotic perspective projections, you'll need to use the <window>.frustum command which allows you to create such things as the asymmetric view frustum used in external monitor stereoscopic rendering (e.g., powerwall, 3D monitor, etc). For many of these applications, Vizard's high-level vizcave module can handle automatically building your needed projections based on real-time head tracking data.
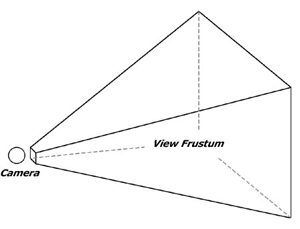
Any given window, whether it's the main graphics window or a sub-window, renders objects within a range of distances from its viewpoint. This range is defined a frustum, a 3D shape that looks like a pyramid with its top cut off, as shown below:
Every window has a field of view that can be adjusted using <window>.fov. For simple applications, you do not need to think about the lens; you will probably be happy with the default lens properties. However, you will occasionally want to adjust some properties of the lens, such as its field of view, and there are several interfaces to do this, depending on how you want to think about the lens. When you start Vizard, a default camera is a perspective lens. A perspective lens is by far the most common kind of lens used, and it behaves the same way the physical lens in a camera works, or for that matter the same way the lenses in our eyes work.
Making the field of view larger will open up the view to more objects, like a wide-angle lens; it will also increase the visible distortion of perspective. The field of view must be greater than 0 degrees and less than 180, but values greater than 90 will seem extremely distorted. (In the real world, perspective lenses rarely go wider than 80 degrees, and that's pretty wide.) The default field of view is 40 degrees vertical, which is usually a pretty comfortable viewing angle.
There is actually a separate horizontal field of view and vertical field of view, one of which is independently controlled (vertical field of view) and other the other dependent on the aspect ratio.
The other parameters needed to define a view frustum are the clip distances. In Vizard, you specify and near and far clip plane with <window>.clip. Objects that are closer than this to the camera plane will not be rendered. You may set the near distance as small as you like, but it must be greater than 0; and the smaller you set it, the greater the likelihood that you will observe an artifact called Z-fighting, a shimmering of objects that are off in the distance. By default, Vizard will dynamically adjust the clip range of your scene to optimize the Z-buffer for reducing Z-fightling as much as possible.
Viewpoints & windows command tables