Vizard 8 » Reference » Stereo & Displays » vizcave » vizcave basics
8.3.1
vizcave is Vizard's representation of a virtual reality cave. Essentially a virtual reality cave is an environment where a screen represents the view at a physical location in that environment. Typically this is done in a special cave setup where the front, left, right and bottom walls are projected onto and the display is updated as the person's position changes.
In a very simple setup one can use a single monitor to act as a window to the outside world. With proper position tracking the information shown in the display would show what can be seen from that position through the window. As one moves nearer to the screen more of the outside world reveals itself, and as one moves to the left of the screen more of the world to the right becomes visible.
The CaveVisualizer.py script in the \examples\tracking folder demonstrates how the vizcave module works in Vizard. Run the script to see how head tracking and viewpoint movements both affect what is rendered on the CAVE walls.
For more information on the Virtual Reality Cave see the wikipedia article.
In the typical cave setup the first part of defining a vizcave is acquiring the proper dimensions of the room's walls relative to the tracking system's coordinates. The position of each corner of each wall needs to be measured after the tracking system has been calibrated. In the typical Cave setup there are eight corners which positions will need to be calculated for.
Here I defined the corners clockwise starting with the left top rear corner as position 0,6,0. Stressing this point once again, these position values need to be the values calculated by the tracker to be used.
The next step is to define each wall in vizard. The following shows how to define the Front and Right wall; the others are trivial.
Now we need to establish the cave environment and create the walls by including the mask which indicates which computer the wall is to be drawn on.
Next we define how our position/orientation is being tracked within the CAVE. This will affect the projection matrices of the rendered output. The projections will only look correct for the user being tracked, for outside viewers they will appear distorted. In a typical setup sensors are mounted to 3D glasses being worn by the user.
In this example we use a tracker object that is assumed to be previously created in the script.
For stereo viewing you must have either a position and orientation tracker or a left/right position tracker. For a single 6DOF tracker, use the line of code above. For separate position and orientation trackers use the pos and ori keywords:
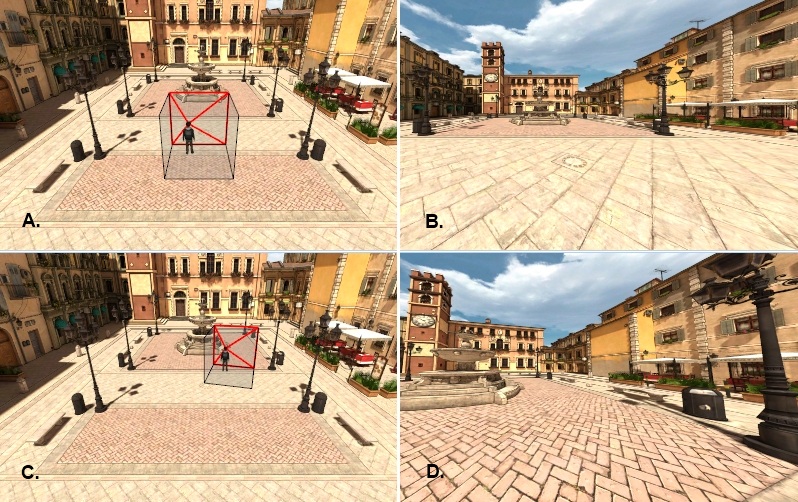
The following images demonstrate how the user's position in the CAVE affects the projection matrices. Image A and C are representations of the user in two different positions in the CAVE. Images B and D show the corresponding output to the front wall:
Note: The cave.setTracker() and cave.update() commands do NOT update the active viewpoint with the tracking position. The user is responsible for applying the tracking data to the active viewpoint. The vizcave.CaveView object (see below) is useful for applying tracking data to the viewpoint in cave environments.
Updating the tracking data can also be done manually with the cave.update() function on a set timer. This would only be necessary if you needed to manually manipulate the tracking data before passing it on to the cave object.
As noted above, the cave object only updates the projection matrices, it does not modify the viewpoint. In a typical CAVE setup the viewpoint is driven around the environment using a wand or joystick device.
The vizcave module includes a helper class for modifying the viewpoint in a cave environment. Here is sample code for using this helper class:
The CaveView class needs a tracker object for initialization. Once created, the CaveView object works like any standard node object. For example, if you wanted to translate the virtual viewpoint origin to (20,5,10) and rotate the view 90 degrees, you would use the following code:
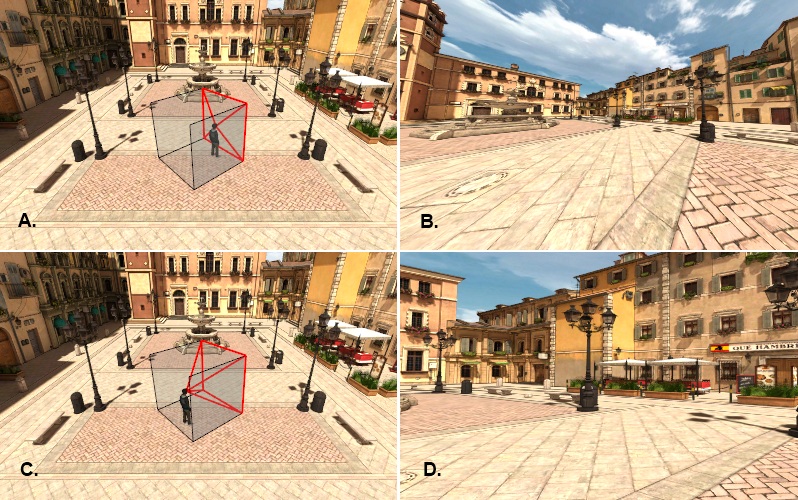
The following images demonstrate how movement of the CaveView object affects viewpoint updates. In images A and C, the CaveView moves from one location to another while the user's tracked position remains constant. In images B and D, the corresponding front wall output shows the change in viewpoint position. Since the user has not moved, the projection matrices are the same in both images: