Vizard 8 » Reference » Shaders » Post-Process Effects » Post-Process basics
8.3.1
The vizfx.postprocess library can be used to apply post-processing effects to the output image of a rendered scene. The effects are created using OpenGL shaders, which provides an endless possibility of effects, including color-correction, distortion-correction, and much more. Multiple effects can be added, allowing the output of one effect to feed into another effect. The library also makes it easy to create your own effects with just a few lines of code.
Run the PostProcess.py script from the \examples\shader folder to experiment with Vizard's built-in effects. Use GUI controls to apply different effects to the piazza scene and immediately see the results.
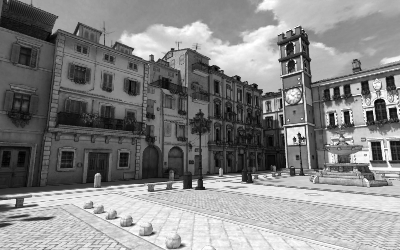
The first step to adding an effect is creating a post-process effect object. For this example we will create a GrayscaleEffect object that comes included with the vizfx.postprocess.color library. Once the effect is created, we simply use the following command to apply the effect to the output:
|
Command |
Description |
|
vizfx.postprocess.addEffect( effect, window = viz.MainWindow ) |
Apply the specified effect object to the output of the specified window. |
For example, take the following script and its accompanying output:
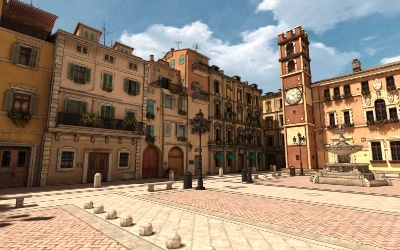
Adding the following code will result in the output below:
The following methods are available on all post-process effect objects:
|
Method |
Description |
|
<effect>.remove() |
Remove the effect from any window it is applied to and remove all its associated resources. |
|
<effect>.setEnabled(mode) |
Set whether the effect is enabled. mode can be any True/False value or viz.TOGGLE. |
|
<effect>.getEnabled() |
Return whether the effect is enabled. |
For instance, add the following code to the above script to toggle the grayscale effect using the spacebar:
You can create your own post-process effect using the BaseShaderEffect base class found in the vizfx.postprocess library.
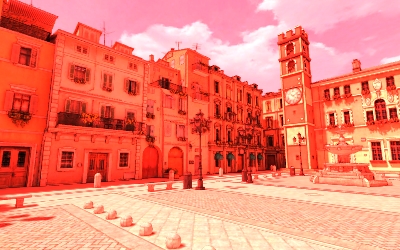
For example, let's create a simple effect that scales the red component of the image. The first thing to do is to define a class that inherits from BaseShaderEffect:
The next step is to specify the GLSL fragment shader code for our effect using the _getFragmentCode method. The incoming image to be processed is represented by the vizpp_InputTex uniform. Most shaders will read the color from this texture, perform some processing on it, and output the new color to gl_FragColor. In our case, we will simply be scaling the red component of the input color by 2:
Let's extend the functionality of our effect by allowing the user to specify the red scale factor. We can add shader uniforms to our effect by adding a _createUniforms method. All uniforms used by the effect must be created within this method. We will also add set/get methods for accessing the scale factor.
As you can see, all uniforms for the effect are accessed through the uniforms attribute of the BaseShaderEffect class. The uniforms object contains the following methods:
|
Method |
Description |
|
<uniforms>.addBool(name, value) |
Add a boolean uniform to the effect with the specified name and initial value. Should only be called within _createUniforms() method. |
|
<uniforms>.addInt(name, value) |
Add an integer uniform to the effect with the specified name and initial value. Should only be called within _createUniforms() method. |
|
<uniforms>.addFloat(name, value) |
Add a floating point uniform to the effect with the specified name and initial value. Should only be called within _createUniforms() method. |
|
<uniforms>.addTexture(name, texture) |
Add a texture to the effect with the specified name. Should only be called within _createUniforms() method. |
|
<uniforms>.setValue(name, value) |
Set the value of an existing uniform with the specified name. |
|
<uniforms>.getValue(name) |
Get the value of an existing uniform with the specified name. |
|
<uniforms>.getUniform(name) |
Get the Vizard uniform object with the specified name. |
|
<uniforms>.getUniformList() |
Get a list of all the Vizard uniform objects created by the effect. |
Now here is our custom post-process effect in action: