Vizard 8 » Content Creation » 3D Models » Optimization
8.3.1
How much you should optimize depends entirely on the scope of your project and the capabilities of the system you will be running it on. For pre-rendered 3d-graphics, rendering a single frame can take anywhere from a few minutes, to a few hours, to a few days. You can imagine, then, that rendering a scene at 60 frames per second comes with some significant limitations. The key to making impressive realtime graphics are learning the limitations of your system and being able to work economically within them. Distributing these limitations across your scene is referred to as budgeting.
Note: Render stats can be displayed in both Inspector and Vizard.
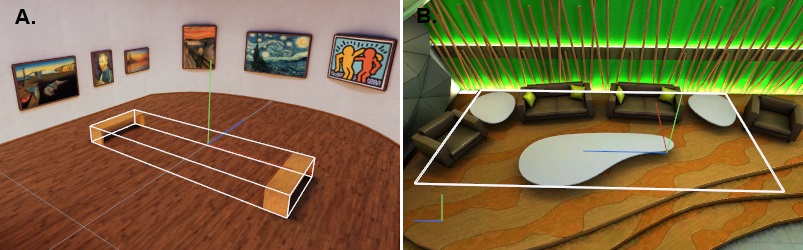
A drawable is one or more geometry objects that share the same material. The cull time is directly related to the number of drawables. A number of several thousand or more is considered high and may affect performance. The drawable count can be reduced by grouping objects together in the modeling software.For example, one hundred boxes (same material) can be grouped together to make one drawable. The downside of grouping is that transformations can only be applied to the group as a whole in Vizard. The following images are taken from Inspector and show a group of two benches (A) and three tabletops (B). The bounding boxes represents one drawable:
In realtime 3d applications, most of the graphics on screen are defined by a series of triangles connected together to form solid-looking objects. Modern video games are modeled so efficiently that they can display entire cities complete with vehicles and characters without the user ever seeing more than 2 million triangles on screen at any given time. The ideal Vizard scene should follow most of the same conventions.
be created through texture instead. To avoid over detailing models, pick a set distance such as 2 or 4 meters as a
reference, then only model details that will be noticeable from that far away.
has to be processed, even if it’s behind another object. These objects should be removed. The extra detail should
instead be used on things the user can see.
for a small number of plants that contribute very little to the overall scene. Rather than getting rid of the plants
altogether, remake them using transparent polygons that use transparency to show clusters of leafs. Ideally,
study the way plant props are handled in modern video games.
complex than the way textures are distributed since some surfaces need more triangles to describe the surface
than others
never get any closer than 50 meters do not need nearly as much geometric detail as props in the active area.
Keeping your texture budget under control is fairly simple. Check how much memory is on your graphics card, and aim for under 75% of that. When textures are loaded onto your graphics card, they are stored in an uncompressed state. therefore, even though you have a 2048x2048 pixel image that is only a few hundred kilobytes as a jpeg, on the graphics card it will be 12mb. If you exceed that budget, you will start having drops in frame rate as your card attempts to load and unload textures. You have three main options: Use fewer textures, use lower resolution textures, or use DXT Compression.
As a general rule, don’t worry too much about close up detail. At any given time, 95% of your scene will be at a distance. Therefore, first focus on making the scene look good as a whole, and only then add close-up detail where it’s absolutely necessary. In most cases, if a texture looks sharp from 4 meters away it has enough detail. Though this varies depending on the current field of view, this works out to be somewhere between 256 and 512 pixels stretched across every meter.
the width in pixels by the height. Since 8 bits is 1 byte, this give you the number of bytes for the image. Divide that number by 1024 for the number of kilobytes, and again for the number of megabytes. Eg. An uncompressed 2048x2048 image is 12mb.
pixel size, then look at the value under “Image Size”.
multiply the number of pixels by 2 bytes. For 32 bits per pixel, multiply by 4 bytes (32 bits/pixel).
When pixels are used in a texture, they are called texels and the amount of texels per cm is referred to as the
texel density. For the main area of your scene, a good density to aim for is about 2.56 pixels per cm. This means
that a tiling map that is 1 meter x 1 meter wide should have a resolution of 256 x 256 pixels.
100 meters away can get away with having a much lower texel density than a prop that the user can walk right
up to.
environment that the user can get close to. Changes in density calls attention to differences in texture sharpness,
which can be jarring for the user, affecting immersion.