This sections explains how transparency works in Vizard. It will also point out some of the limitations with transparent objects and ways to work around it.
There are two common methods in Vizard for creating transparent or semi-transparent objects; setting the material alpha value (<node3d>.alpha) or applying a texture containing alpha pixels (<node3d>.texture). Setting the material alpha applies uniform transparency for the entire object. This is useful for fading an object in or out. Applying alpha textures is useful for creating non-uniform transparency. This can be used to simulate objects that would otherwise be too complex to model (e.g., chain-link fence, vegetation, smoke particles).
In order for transparency to work properly, the scene behind the transparent object must be rendered first. When the transparent object is rendered, it will blend each pixel of the object with the pixel of the scene behind it. The alpha value of the object at each pixel and the blending method enabled determine how the blending is performed. The <node3d>.blendFunc command can be used to change the blending function for the object. By default, the blending function is setup to use the objects alpha value to blend between the object and scene pixel value, with 1 meaning no transparency and 0 meaning completely transparent.
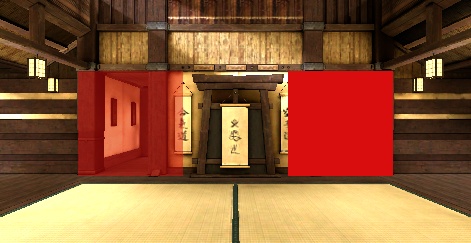
In the image below, the quad on the left has an alpha of 0.5 and the quad on the right has an alpha of 1.0:

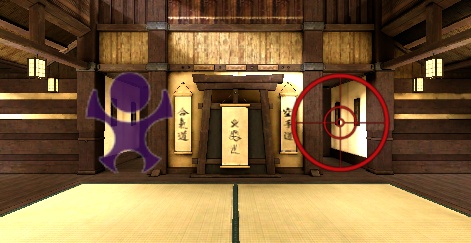
For texture based transparency, you must first create an image containing an alpha channel. The most commonly used image formats that support alpha channels are PNG, TIF, and TGA. The image below demonstrates how complex shapes can be rendered using a single quad with an alpha texture applied:

When changing the alpha or applying an alpha texture, Vizard will automatically enable blending on the object and increase the draw order. The changes are equivalent to the following commands:
The default draw order is 0, so increasing it to 10 ensures that the object is rendered after most non-transparent objects. In addition to increasing the draw order, the object is placed in the transparent drawing bin. Objects in the transparent bin will be rendered in order of farthest to nearest from the viewpoint. This allows proper blending between multiple transparent objects.
When rendering with alpha the final image is a blending of two or more objects. Depending on the combination of alpha objects and their placement, issues can arise with the final blended image.
A common problem of transparent rendering is having objects disappear behind transparent objects. This usually occurs when transparent objects intersect or when a single transparent object contains layers of polygons that appear behind one another. Since transparent objects are sorted at the mesh level, individual polygons within the mesh might not be rendered in the correct order.
One workaround is to break up the transparent objects into smaller individual objects within your 3D modeling tool. This gives the rendering engine more fine-grained control with the order in which transparent objects are rendered.
Breaking up the objects can work to an extent, but for complex self-intersecting meshes (e.g., vegetation models) this solution is not very practical or efficient. Another workaround is to use alpha-to-coverage, which is supported by most modern graphics cards. Instead of blending each pixel with the scene behind it, alpha-to-coverage uses the alpha value to automatically create a screen-door transparency effect. In order to use the alpha-to-coverage feature, multi-sampling must be enabled (i.e., <viz>.setMultiSample). This feature can be enabled by simply using the viz.SAMPLE_ALPHA_TO_COVERAGE flag with the <node3d>.enable command. It is also suggested to disable blending when using alpha-to-coverage:
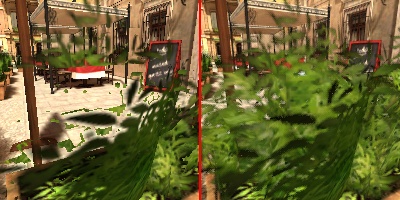
The image below demonstrates the effect of using alpha-to-coverage. In the left half of the image you can clearly see missing pixels in the vegetation. After enabling alpha-to-coverage, all the pixels are properly rendered, as seen in the right half:
