In this tutorial you'll learn how to create a collaborative scene with the grabber and laser pointer tools. Collaboration is a feature of clustering that allows multiple users to share the same virtual environment. The main application is run on the cluster master and each user runs a vizconnect file with their own hardware connections. Typically not much coding is required to turn a single user application into a collaborative one. However, it does require the addition of boiler plate code into various sections of the application and vizconnect scripts.
First create a folder (e.g. Collaboration Tutorial) on the master machine to save the files that will be created in this tutorial.
The user connected to the machine running the cluster master specifies a vizconnect file in the main application code. Each client user specifies a vizconnect file in their cluster client settings. The display, tracker, input, and transport configuration is the same for both collaboration and single user setups. In collaboration mode, tools are configured in a different way and both avatars and events are not supported. Collaboration automatically renders a head and hands avatar for each user.
From the Tools tab in Vizard, select the Vizconnect option. When prompted, press OK to save the file and browse to your new tutorial folder. Save the file as vizconnect_config_desktop.py. From the Vizconnect start page, select the first option to go to the Presets menu. In the presets list, select the Desktop walking with one hand using keyboard and mouse option and press the Apply Preset button. Next, go back to the start page and select the third option to go to the advanced menu.
Adding tools for collaboration is a two step process. First, in the vizconnect configuration utility, a proxy tool is added for each input device (e.g. wand, hand controller) used in the simulation. Proxy tools are used as placeholders for other tools. Using the configuration utility, mappings are defined for a set of actions the proxy tool can take. Next, in the application script, the tool needed by the application is created (e.g. grabber, pencil, laser pointer, etc). The proxy tool's actions are then redirected to control the newly created tool.
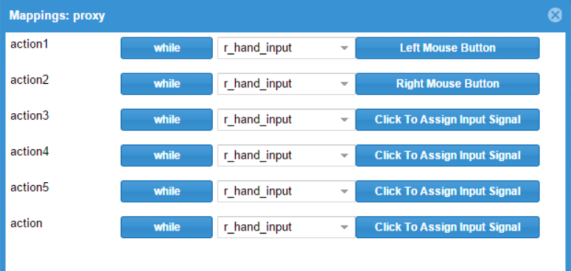
For this desktop configuration, the mouse buttons will be used for both the grabber's grabAndHold action and the laser pointer's shoot action. Since both actions are controlled by the same input device, only a single proxy tool is required. Go to the Tools section, where a proxy tool has been added as part of the preset configuration. Press the Mappings button to see the mappings between actions and input signals. There is a default mapping between action1 and the Left Mouse Button. Press the Click to Assign Input Signal button for action2 and select the Right Mouse Button. The mappings should look like the following image:

The vizconnect file requires the addition of several lines of code to the postInit section. Open the file in the Vizard editor, find the postInit section, and add the following code before the return None statement:
Start a new Vizard script and save it in your collaboration tutorial folder. Next, add the following code to set the scene. This loads the dojo environment model and several objects for grabbing:
Next, add the following code. This creates a grabber tool, sets its parent to be the proxy so it has the same position and orientation, sets the list of objects that it can grab, and redirects the proxy's first action to the grabber's grabAndHold action:
Although the code above may look complicated, the same code with minor adjustments can be copied into any collaboration script that uses grabbing. To change the grabber tool settings, modify the parameters in the following line of code:
Note: The examples/collaboration directory contains example scripts for using each tool in collaboration. The tool API pages explain all tool settings and actions.
The last code block specifies the total number of proxy tools. This is the sum of proxy tools for all users in the simulation. The code below is setup for two users (1 master + 1 client), each with one proxy tool:
Collaboration needs to be enabled in both the cluster client and cluster master tools. On the cluster client machine:
On the cluster master machine: