Vizard 8 » Tutorials & Examples » Vizard Introduction » Hardware Connection
8.3.1
In this section you'll create a Vizconnect configuration file that connects to either an Oculus, Vive, or desktop system. Vizconnect is Vizard's tool for connecting displays, trackers, and much more without programming. The visual interface lets you connect devices on-the-fly and see the results immediately in a Vizard render window. Based on selections made in the interface, Vizard code is automatically generated and saved in a configuration file.
Once hardware is working in Vizconnect, simply import the configuration into your own Vizard application and your hardware will connect there as well. This helps to maintain an important software-hardware abstraction that frees you to design and develop your interactive simulations independently of the actual hardware used. For example, the same application script can be run on an Oculus, Vive, or Projection system by importing different configuration files.
From Vizard, go to Tools > Vizconnect to open Vizconnect. A dialog will be displayed prompting you to save the configuration file. Press the ok button and then in the Save As dialog browse to the tutorial folder. Save the file as vizconnect_config.py.
Note: The configuration file automatically syncs with the GUI state. It will not be necessary to manually save it again later after selecting your hardware.
You should see two windows now. The vizconnect GUI, where components are added and configured and a graphics window that runs the GUI configuration in real-time.

The GUI window shows the Startup page with three options for creating configuration files:
Select the preset configurations option. If you have an Oculus headset connected, choose the Vizbox/Oculus Touch option. If you have a HTC Vive headset connected, choose the HTC Vive option. Otherwise, select the Desktop walking option.
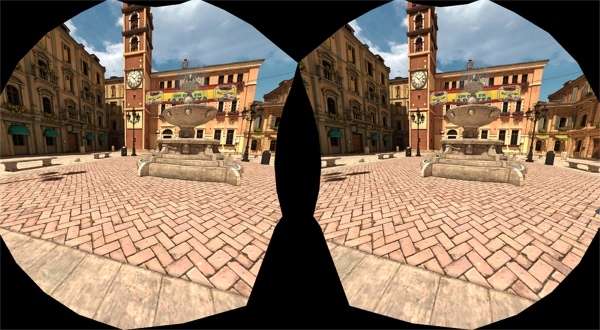
Press the Apply Preset button and depending on your selection you should see the piazza scene in your Oculus, Vive, or desktop display:
Note: If you do not see anything in the Oculus or Vive, close down the vizconnect GUI and graphics windows, and double click the vizconnect_config.py file to run vizconnect again.
Each preset configuration has default controls for navigation, which are listed below. To customize controls and map different input signals to movements, use the vizconnect advanced menu.
The Oculus and Vive viewpoints are mirrored to a desktop window. You can change the way this is displayed (both left and right eyes or a mono view) in either vizconnect or the application code.