Vizard 8 » Content Creation » 3D Models » OSG Workflow » Light Baking
8.3.1
Baking refers to using a program such as 3ds Max to create a texture map based on some aspect of the scene. This section introduces simple techniques for creating complete maps and light maps for your Vizard models.
Realistic lighting is difficult to achieve in real-time, and when it is, it takes a lot of processing power. By letting 3ds Max calculate realistic lighting before hand on all non-moving (static) objects, none of that processing has to be done in real-time and the graphics card can display complex scenes with a higher frame rate. Moving objects (dynamic objects), however, still have to be lit by real-time lights.
A complete map is a new texture for the model created from the original textures and lighting information.
Complete Map Pros:
Complete Map Cons:
Light maps are a record of luminance values. These values are multiplied against the diffuse textures to add lighting and shadows:
Light Map Pros:
Light Map Cons:
In the real world, direct light bounces off the environment, resulting in soft shadows, color bleeding, and dark areas that brighten up with indirect light. In 3D rendering, global illumination techniques take light bounces into account to create the same effects. Due to these calculations, they require additional processing time and power. Different renderers (e.g. Scanline, Mental Ray, V-Ray) have their own versions of global illumination.
The instructions included here use the default settings of the scanline renderer. The lighting calculations only take into account how the initial rays hit objects in the scene. Many users will be happy with the results achieved using these defaults. For those of you who want greater photorealism, it's necessary to explore advanced lighting. Either way, the baking methods you'll learn here are independent of the renderer and lighting setting used.
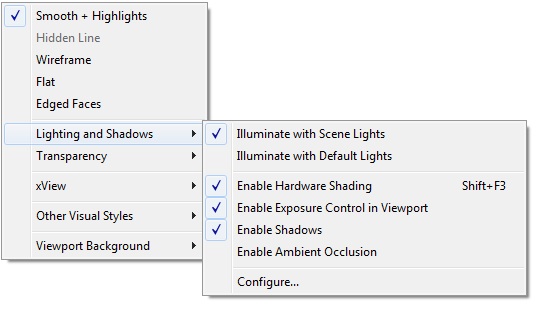
Max's hardware renderer gives you a realistic preview of the lighting in your scene. The additional realism does come at the cost of performance, so for complex scenes, you’ll need to back off these settings.
Right click the viewport label to set the render method:

If you are baking a scene and care more about quick turnaround than photorealism, consider using a flat ambient light instead of physically accurate global illumination.
Without ambient light, it is difficult to see detail in shadowed areas. In the real world, direct light bounces off the environment, brightening up darker areas with indirect light (global illumination). Calculating this accurately requires a lot of time and processing power.
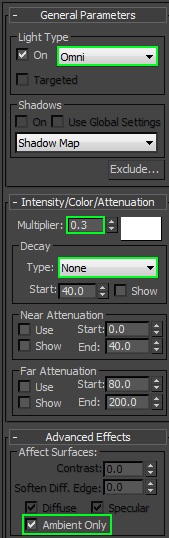
MAX’s Environment … Global Lighting ambient light does not export to the OSG format. Instead, add an omni light in ambient mode, as in the graphic below and this will serve to bump up the lighting levels created by your other lights.
Note: You must have other non-ambient light(s) in the scene. If there is only ambient light you will not see any shadows cast.
Light Type: set to Omni
Multiplier: Use a low value
Decay Type: set to None
Affect Surfaces: enable Ambient Only
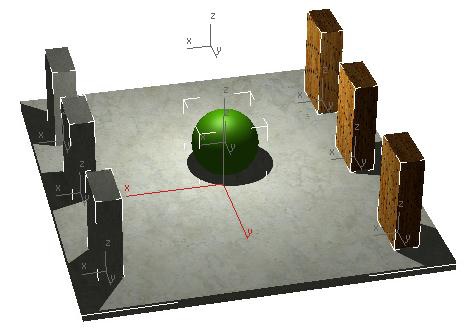
From the viewport, select all objects you want to bake. These objects will show up in Render to Texture under Objects to Bake.
For consistency, bake Lightmaps and Completemaps to Mapping Coordinate channel #3. (UVW Channel 3)
Output Path: Pick the location
where the baked images will be stored.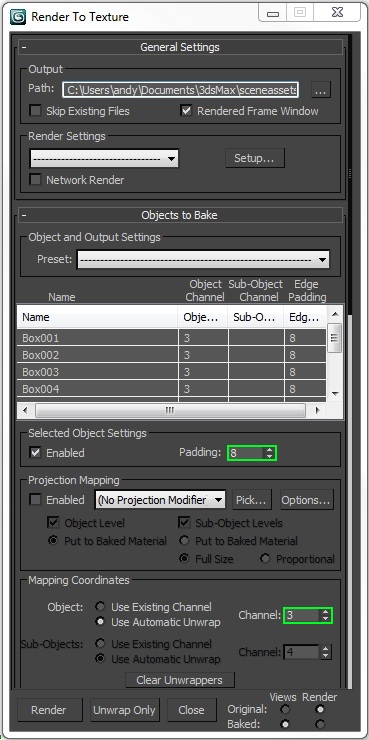
Objects to Bake: Selecting objects in the viewport puts them in the “to bake” list
Padding: 8 or more pixels recommended
Mapping Channel: Channel 3 recommended
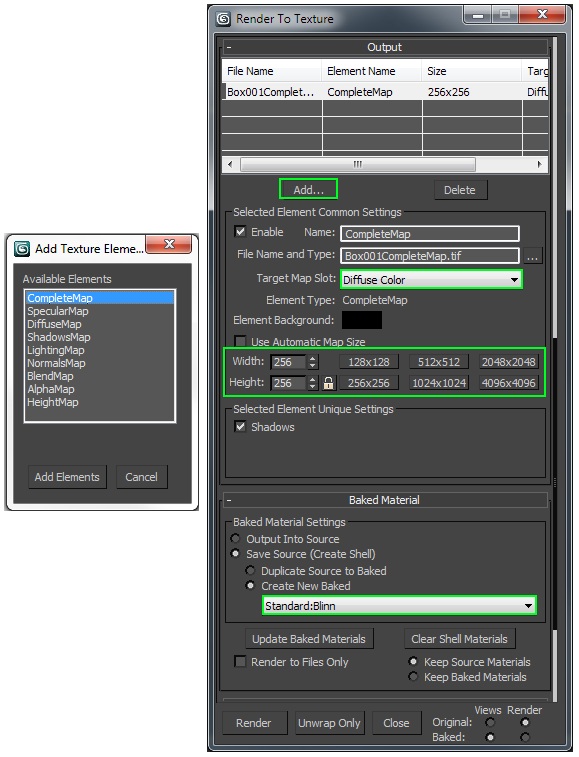
CompleteMaps are a record of brightness and color stored inside an image file. CompleteMaps are the most effective means of capturing lighting and materials into a static texture.
The main limitation is a lack of realtime reflection, though this can be achieved through other methods where necessary. Static textures cannot directly produce view dependent effects.
The resolution of close-up detail of your real-time scene will entirely depend on the size you choose for the rendered textures.
LightMaps are a record of luminance values stored inside an image file. Compared to CompleteMaps, LightMaps provide:
When creating a LightMap, the source model should contain all Standard materials. These will be duplicated to the baked model. In the case of a CompleteMap this is not necessary because the bake will create a new Standard material shell from the source materials and lighting information.

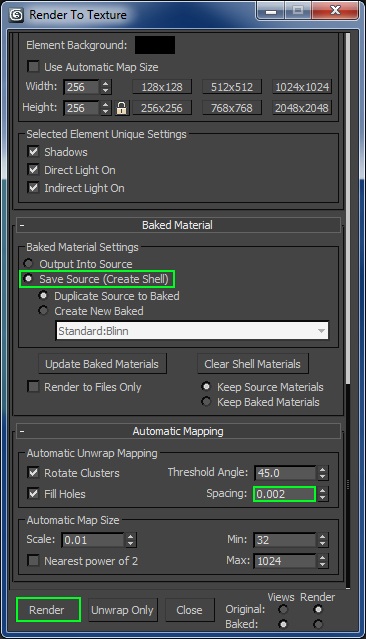
In the settings for both methods described above the Save Source option was specified. This instructs Max to save the result in a new shell material. When you export your scene to Vizard, the exporter will choose any baked shell materials over your original materials when available.
Reducing the Spacing value in the Automatic Mapping rollout can help increase the resolution of the baked scene. Although the map resolution is specified above, the map will contain unused space. By reducing this value, spacing is more efficient and more detail is fit in. A possible downside is that mip-mapping (performed automatically in Vizard) will bring in unwanted colors on seams.
In the OSG export dialog
The quickest way to see how the baked scene will appear in Vizard is to preview the model in Inspector:
Either render with global illumination or add ambient light. With global illumination, you'll achieve results that are more photorealistic. However, the processing time and power required will be greater. Ambient lights, on the other hand, don't add much additional calculation. They are quick and easy to set up and serve to uniformly brighten up dark areas.
If using global illumination, each renderer has exposure control settings that also affect the brightness of the scene. For Scanline use logarithmic exposure, for mental ray use MR Photographic, and for VRay use VRay Exposure Control.
If materials contain only a flat color and no diffuse map this will happen. In addition, this can also be due to bad exposure settings or accidently turning on the lightmap multiplier settings in the OSG exporter. One quick way to replace flat colors in models is to add in a procedural checker texture, and set both swatches to the diffuse color. The exporter will automatically convert this to a texture map in the exported file, allowing it to correctly combine with other maps in the expected way.
Raise the padding value and/or increase spacing. Usually it's both that need to be done as the default values don't really take mip-mapping into account. If using Mental Ray though, having too much spacing can also cause seam-like artifacts to appear, since any UV island that would be thinner than 1 pixel in either direction before padding is completely ignored and will show the "background" color instead. That does not happen in Scanline or V-Ray.