Vizard 8 » Tutorials & Examples » Vizconnect » Displays and Trackers » Tutorial: Displays
8.3.1
In this tutorial you will learn how to add a sub window display and apply a fixed offset to the viewpoint.
Note: This section continues with the configuration and script used in the previous section.
So far we've configured a single display that renders to the main window. We can also overlay smaller sub windows on the main window to show different points of view within the scene (e.g. 3rd person, bird's eye). Go to the Displays tab, click Add a New Display and select the Custom Window option again. This time the sub window parameter is automatically checked because only one display can be applied to the main window at a time. Click Apply & Exit and a small window will appear in the upper left hand corner of the graphics window. You'll see that the viewpoint is fixed at ground level, just as it was when we added the first display.
After a sub window is added, you can change its position and size in
the Size/Pos ![]() dialog
box. The values for width and height are set to 0.2 by default. This value
is the size of the sub window relative to the graphics window. Try experimenting
with different values in the width/height fields and alignment drop down. Before moving on to the next section, set the width to 0.35 and the height to 0.7.
dialog
box. The values for width and height are set to 0.2 by default. This value
is the size of the sub window relative to the graphics window. Try experimenting
with different values in the width/height fields and alignment drop down. Before moving on to the next section, set the width to 0.35 and the height to 0.7.
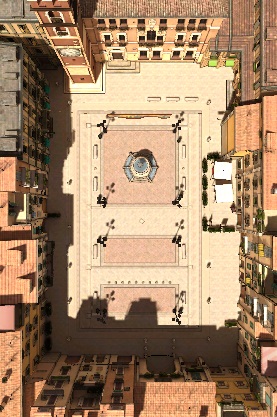
Next, we'll set up a fixed viewpoint with a bird's eye perspective of
the scene. From the Trackers tab,
click Add a New Tracker, select
the Group tracker option, and
click Apply & Exit. A group tracker does
not provide data like other trackers. It's just a node in the scene graph
with position and orientation that can be made a parent or child of any
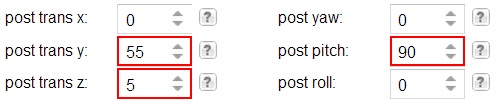
other node. To specify this group's location, open the Offsets ![]() dialog box. For a bird's eye view add some position offsets
and pitch the view down 90 degrees. Then click Apply and Exit.
dialog box. For a bird's eye view add some position offsets
and pitch the view down 90 degrees. Then click Apply and Exit.
Now all that's left to do is set the viewpoint of the sub window display to be a child of the group tracker. Go to the scene graph pane and drag custom_window2 under group. In the graphics window you should now see a sub window with a bird's eye view.